
Once your Google calendar or Outlook calendar has been connected, your next step is to set up your booking links. A booking link lets clients schedule appointments with you around the clock, with no phone tag, and no back-and-forth emails. Once your calendar is connected, you can set your availability, define appointment types and durations, and share a booking link that works while you're focused on running your business. Fewer scheduling gaps means more revenue on the calendar, and every booked appointment is a lead that converted without you lifting a finger. You will need to create a separate booking link for each appointment type you offer. For example, one for a consultation, one for a follow-up, and one for an in-person service call.
How to Set Up a Booking Link
To create a booking link, first click on My Day in the left-hand navigation. Then, click on Appointments. To create a new booking link, click on the + icon.
Step 1: Name Your Booking Link and Set the Location
- Enter a name to associate with your appointment link i.e. "Consultation". Note that the name will become the end of the booking URL
If you would rather use your business name instead of your personal name in the booking link, check the box below the name field to enable. This will include business name in the booking link URL.
2. Set the Location for this appointment type. Select the location type for this appointment. The three available options are Online, Phone, and In Person. Complete only the section that applies to your appointment type
Online Appointment
You can choose to provide an online meeting link or let the invitee provide a meeting link.
If Let the invitee choose a meeting link is selected, the invitee will be required to fill the Your online meeting link field on the appointment invitation they receive by email.
Phone Appointment
You can elect to call the customer (ask the invitee for their phone number) or request the invitee call the user (by providing a phone number to for the invitee to call).
If I will call the customer is selected, the invitee will be required to fill the phone field on the appointment invitation they receive by email.
In Person Appointment
Location: In Person - The user can elect to choose the meeting location and provide an address, or let the invitee choose the location (request an address from the invitee).
If Let the invitee choose the location is selected, the invitee will be required to fill the Where will we meet field on the appointment invitation they receive by email.
3. Once you have set the location for the appointment, Click Next to proceed to Step 2: Set Availability, Duration, and Date Range.
Step 2: Set Availability, Duration, and Date Range.
1. Select a duration for the appointment. The available options are 15, 30, 45, 90 minutes, 1 hour, or 2 hours increments.
Alternatively, you can scroll to the bottom of the appointment duration drop-down to select a custom duration.
2. If Custom duration was selected, select the duration using the Hour and Minute selection boxes
3. Determine whether this appointment type will only be available for a limited time, or available indefinitely. To learn more about creating an appointment type with a specific date range, click here.
- # of Days in Advance - If selected, the appointment type will only be available for booking up to the allowed number of days in advance. This will prevent your customers from booking a service very far into the future.
-
Within a Specific Date Range - if selected, the appointment type will only be available between the selected start date and end date. Use the date picker that appears by clicking on the Start date first and then the End date
-
Indefinitely into the future - this will not set a date limit for booking this appointment type
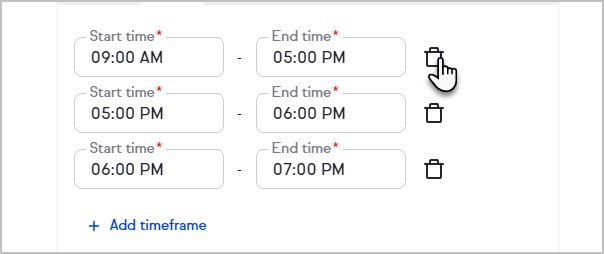
4. Choose time frames across any day of the week that you want this appointment type to be available
Click + Add timeframe to add additional timeframes to that day
Click the trash bin button to remove a timeframe
5. Indicate whether buffer time is needed before or after the appointment. You have the option of putting a buffer time of 15, 30, or 45 minutes between appointments. If buffer time is enabled, your calendar will be blocked for the selected amount of time before and/or after the appointment. This time will not be visible to your customers.
6. Specify the amount of advanced notice required. Use the number field to select a number of minutes, hours, or days that you will need before an appointment can be booked on your calendar.
7. Click on the Next button to move on to Step 3: Add Pre-Appointment Instructions
Step 3: Add Pre-Appointment Instructions
Activate the toggle to add Pre-appointment instructions. Use the field provided to type a message to your customer that they will see before the appointment.
Your client will see the pre-appointment instructions at the top of the booking confirmation page.
Next, select which calendars should be used to determine your availability. If you select multiple calendars, you will be prompted to select a calendar for new appointments to be added.
When finished, click the Next button to proceed to Step 4: Connect Automations to Your Booking Link
Step 4: Connect Automations to Your Booking Link
Finally, you are able to add an automation to your booking link. Note that this step is optional, as your link will still function without an attached automation. However, automations are a fantastic tool for ensuring your customers get a timely follow up, reminders, and to add any tags, notes, or tasks for them in your CRM.
Either select from one of the suggested automations, or click on Create custom automation to build your own.
If you select a suggested automation, the easy automation builder will pop out from the right-hand side, with the necessary automation steps pre-populated. You are able to use the tri-dots on each step to customize them, or click on the + icon to add additional steps. When finished, ensure that you click on Publish to ensure your automation is saved.
Alternatively, if you select Create custom automation, the easy automation builder will pop-out from the right-hand side, but will not have any steps populated. Click the Then card. and select what action you would like to take place once a consultation is scheduled.
Now, select what action you would like to take place once a consultation is scheduled. The most common options are at the top, but you can scroll down the panel to see all available options. To learn more about creating Easy Automations, click here
Click Preview when you are finished.
When you are finished, click the Publish button at the top right of the page to ensure your automation is saved.
Next, click on Finish to create the booking link.
When completed, a confirmation screen will appear. From here, use the buttons to preview the live booking page, Email the booking link, copy the booking link, or access the booking page code snippet to embed on your website.
Pro tip! Your booking link automatically knows when it is Daylight Savings, so you will see different times if the dates viewed are after a time change.
CLICK HERE to learn how to embed code on the 3 most popular website platforms (WordPress, Wix, and Squarespace)
Add Your Booking Link to Your Website or Landing Page
- To access the embed code for a booking link, first click on My Day in the left-hand navigation. Then, click on Appointments. Then, click on the tri-dots on the tile of the desired booking link.
- Click Embed code
- Click the Copy code button
- From here, you'll need to add this code to your website or landing page.
CLICK HERE to learn how to embed code on the 3 most popular website platforms (WordPress, Wix, and Squarespace)
Comments
0 comments