
This article covers how to send confirmation emails to contacts in Keap™, including how to send a one-off confirmation from a contact record and how to set up a bulk Email Confirmation Sequence in the automation builder. Confirmation emails ask contacts to click a link to confirm they want to receive marketing emails from the business. Sending confirmation emails to unengaged or unconfirmed contacts improves email deliverability by reducing the number of unengaged contacts in the sending list. This article does not cover how to create standard automation sequences. For help with automation, see how to create a campaign in the Keap automation builder.
Why Sending Confirmation Emails Improves Your Email Deliverability
Email deliverability depends heavily on sending to contacts who actually want to receive messages. Contacts with unengaged, non-marketable, or unconfirmed statuses reduce overall deliverability because messages sent to them are more likely to be ignored, marked as spam, or rejected by email providers. A confirmation email gives these contacts the opportunity to actively confirm they want to receive communications — contacts who confirm are more likely to engage, improving the sender reputation of the account over time.
Confirmation emails can be sent to contacts with the following email statuses:
Unengaged Marketable
Unengaged Non-Marketable
Non-Marketable
Unconfirmed
Important: A contact can receive a maximum of 2 confirmation emails within any 30-day period. Attempting to send a third confirmation email within 30 days will display the following message on the contact record: "You have exceeded the maximum amount of confirmation emails that you may send to this recipient. You may only send 2 confirmation emails within a 30 day period."
How to Send a One-Off Confirmation Email From a Contact Record
Use this method to send a single confirmation email to one contact at a time from the contact's record in Keap.
For Keap Pro and Max
Select Reports in the left-hand navigation, then select Email Status Search.
Search for the email address of the contact to confirm.
-
Select the Edit link in the Manage Status column next to the contact.
The screenshot above shows the Keap Email Status Search results screen. The Edit link appears in the Manage Status column next to each contact result. Selecting Edit opens the email status management panel for that contact.
-
In the You Can section of the email status management panel, select Send Confirmation Email.
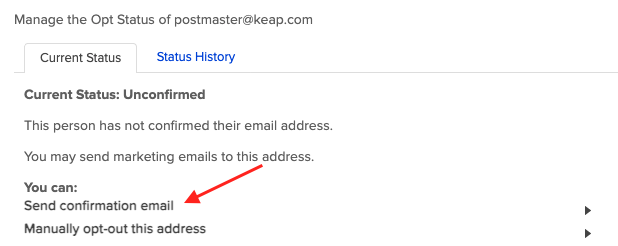
The screenshot above shows the You Can section of the Keap email status management panel with the Send Confirmation Email option visible. Selecting Send Confirmation Email prepares the confirmation email to be sent to the contact.
-
Select Send Email to send the confirmation email.
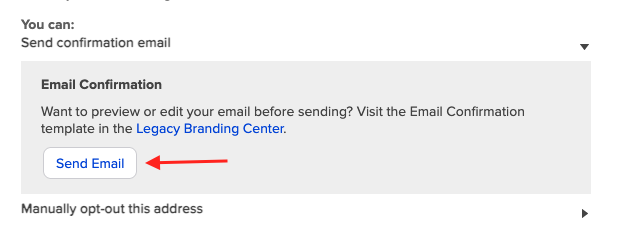
The screenshot above shows the Send Email button in the Keap confirmation email sending panel. Selecting Send Email sends the confirmation email to the contact immediately.
-
When the message "An email confirmation has been sent" appears, the confirmation email has been successfully delivered.
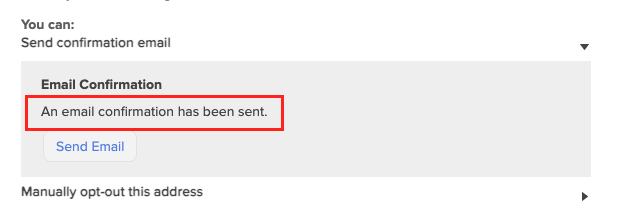
The screenshot above shows the success message displayed after a confirmation email has been sent in Keap. The message "An email confirmation has been sent" confirms the email was successfully delivered.
For Keap Classic
Open the contact record for the contact whose email address needs confirmation.
-
Scroll to the Email / Social section on the contact record and select Manage Email Status.
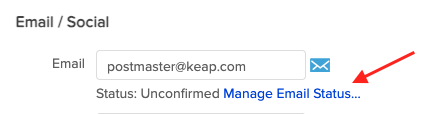
The screenshot above shows the Email / Social section on a Keap Classic contact record with the Manage Email Status link visible. Selecting Manage Email Status opens the email status management panel for the contact.
In the You Can section, select Send Confirmation Email, then select Send Email.
When the message "An email confirmation has been sent" appears, the confirmation email has been successfully delivered.
How to Send Bulk Confirmation Emails Using an Automation Sequence
Use this method to send confirmation emails to multiple contacts at once using an Email Confirmation Sequence in the Keap automation builder. An Email Confirmation Sequence is a special automation that sends a confirmation request to contacts when a specific tag is applied to them. This method requires creating the automation first, then applying the trigger tag to the contacts who should receive the confirmation email.
For Keap Pro and Max — Set Up the Email Confirmation Sequence
-
Select Automation in the left-hand navigation, then select My Automations, then select Create an Automation.
The screenshot above shows the Keap My Automations screen with the Create an Automation button visible. Selecting Create an Automation opens the automation type selection panel.
-
Select Advanced Automation to open the automation builder.
The screenshot above shows the Keap automation type selection panel with the Advanced Automation option visible. Selecting Advanced Automation opens the campaign builder where the Email Confirmation Sequence is configured.
-
Enter a name for the automation and select Save.
The screenshot above shows the Keap automation naming panel. Enter a descriptive name for the Email Confirmation automation and select Save to create the automation and open the campaign builder canvas.
In the automation builder, set the When trigger to Tag is Applied and the Then action to Get Email Opt-In.
-
Connect the Tag is Applied trigger to the Email Confirmation Request sequence on the campaign canvas.
The screenshot above shows the Keap automation builder campaign canvas with the Tag is Applied trigger connected to the Email Confirmation Request sequence. The connection line runs from the trigger block to the sequence block.
-
Select the Tag is Applied block, then select View and Edit. Create a new tag named Confirmation Email Start and select Add "Confirmation Email Start". Select Save in the Add New Tag panel — the tag category is optional. Select Save again to close the tag settings.
The screenshot above shows the Add New Tag panel in the Keap Tag is Applied goal settings. The tag named Confirmation Email Start is entered and will be created when Save is selected. This tag will be the trigger that adds contacts to the Email Confirmation automation.
-
Select the Email Confirmation Request sequence block, then select View and Edit. The sequence contains a pre-built confirmation email and a delay timer.
The screenshot above shows the Keap Email Confirmation Request sequence editor. The sequence contains a pre-built confirmation email and a delay timer. The confirmation email can be customized within the allowed areas before the sequence is published.
-
Select the Confirmation Email block, then select View and Edit, then select Edit Email. The confirmation email is locked for CAN-SPAM compliance — only the following areas can be customized:
Subject Line
Intro Paragraph
Thank You message
The screenshot above shows the Keap confirmation email editor with the Edit Email button visible. The confirmation email is locked for CAN-SPAM compliance. Only the Subject Line, Intro Paragraph, and Thank You message areas can be modified.
-
After making any changes, mark the email as Ready and select Done.
The screenshot above shows the Ready toggle and Done button in the Keap confirmation email editor. Toggling the email to Ready marks it as configured and selecting Done closes the email editor and returns to the sequence.
-
Select the X to close the confirmation email edit panel and return to the sequence.
-
Select Done to close the sequence editor and return to the campaign canvas.
-
Select Publish on the campaign canvas to make the automation active, then confirm by selecting Publish again in the confirmation dialog.
The screenshot above shows the Publish button and confirmation dialog on the Keap automation builder campaign canvas. Selecting Publish twice makes the Email Confirmation automation active. The automation will begin sending confirmation emails to contacts when the Confirmation Email Start tag is applied to them.
Note: A second reminder confirmation email can be added to the sequence to increase the chance that contacts confirm their email address. Adding a second confirmation email is useful for contacts who do not respond to the first confirmation request.
For Keap Pro and Max — Apply the Trigger Tag to Send Confirmation Emails
Select Reports in the left-hand navigation, then select Email Status Search.
Search for the contacts to send the confirmation email to.
-
Select the Select All checkbox at the top of the results to select all matching contacts.
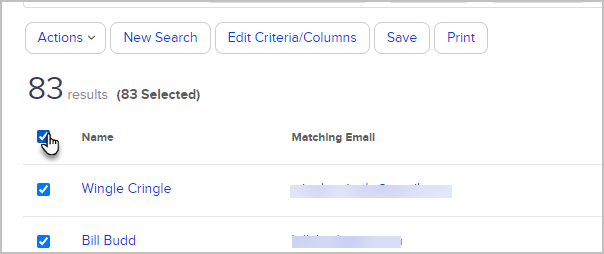
The screenshot above shows the Keap Email Status Search results screen with the Select All checkbox visible. Selecting the Select All checkbox selects all contacts in the search results for the bulk tag action.
-
Select the Actions dropdown and choose Apply/Remove Tag.

The screenshot above shows the Keap Email Status Search results screen with the Actions dropdown open. The Apply/Remove Tag option appears in the dropdown. Selecting Apply/Remove Tag opens the tag application panel.
-
Select the Apply radio button, select the Confirmation Email Start tag created in the automation setup steps above, then select Save.
The screenshot above shows the Keap tag application panel with the Apply radio button selected and the Confirmation Email Start tag chosen. Selecting Save applies the tag to all selected contacts and triggers the Email Confirmation automation.
-
Select Process Action to apply the tag to all selected contacts.
The screenshot above shows the Process Action button in the Keap bulk tag action confirmation screen. Selecting Process Action applies the Confirmation Email Start tag to all selected contacts. Each tagged contact is automatically added to the Email Confirmation automation and will receive the confirmation email.
For Keap Classic — Set Up the Email Confirmation Sequence
-
Select Marketing in the navigation, then select Automation Builder.
The screenshot above shows the Keap Classic navigation with the Marketing option selected and the Automation Builder visible. Selecting Automation Builder opens the campaign builder where the Email Confirmation Sequence is configured.
-
Select Create Your Own to create a new automation.
The screenshot above shows the Keap Classic Automation Builder with the Create Your Own button visible. Selecting Create Your Own opens the automation naming panel.
-
Enter a name for the automation and select Save.
Drag a Tag Applied goal onto the campaign canvas in the automation builder.
Drag an Email Confirmation sequence onto the campaign canvas.
-
Draw a connection line from the Tag Applied goal to the Email Confirmation sequence.
The screenshot above shows the Keap Classic automation builder campaign canvas with the Tag Applied goal connected to the Email Confirmation sequence.
-
Double-click the Tag Applied goal block, then select View and Edit. Create a new tag named Confirmation Email Start, select Add "Confirmation Email Start", then select Save in the Add New Tag panel. The tag category is optional. Select Save again to close the tag settings.
The screenshot above shows the Add New Tag panel in the Keap Classic Tag Applied goal settings. The Confirmation Email Start tag is entered and will be created when Save is selected.
-
Double-click the Email Confirmation Request sequence block to open it. The sequence contains a pre-built confirmation email and a delay timer.
-
Select the Confirmation Email block to open it. The confirmation email is locked for CAN-SPAM compliance — only the following areas can be customized:
Subject Line
Intro Paragraph
Thank You message
-
After making any changes, mark the email as Ready and return to the sequence.
-
Mark the sequence as Ready.
-
Select Publish to make the automation active.
Note: A second reminder confirmation email can be added to the sequence to increase the chance that contacts confirm. Adding a second confirmation email is useful for contacts who do not respond to the first confirmation request.
For Keap Classic — Apply the Trigger Tag to Send Confirmation Emails
Select Marketing in the navigation, then select Reports, then select Email Status Search.
Search for the contacts to send the confirmation email to.
Select the Select All checkbox at the top of the results to select all matching contacts.
Select the Actions dropdown and choose Apply/Remove Tag.
Select the Apply radio button, select the Confirmation Email Start tag, then select Save.
Select Process Action to apply the tag to all selected contacts. Each tagged contact is automatically added to the Email Confirmation automation and will receive the confirmation email.
Frequently Asked Questions
What does this article cover?
This article covers how to send confirmation emails to contacts in Keap, including how to send a one-off confirmation from a contact record and how to set up a bulk Email Confirmation Sequence. For help with automation sequences, see how to create a campaign in the Keap automation builder.
How many confirmation emails can be sent to a contact within 30 days?
A maximum of 2 confirmation emails can be sent to the same contact within any 30-day period. Attempting to send a third confirmation email within 30 days will display an error message on the contact record indicating the limit has been reached.
Can the confirmation email be fully customized?
No. The confirmation email in the Email Confirmation Sequence is locked for CAN-SPAM compliance. Only the Subject Line, Intro Paragraph, and Thank You message can be customized. The confirmation link and other required compliance elements cannot be removed or modified.
Should I add a second confirmation email as a reminder?
Adding a second reminder confirmation email to the Email Confirmation Sequence is recommended. A second confirmation email increases the likelihood that contacts who do not respond to the first request will confirm their email address. The second email counts toward the 2-email limit within 30 days — so only one additional reminder can be added per 30-day period.
Comments
0 comments