
Stop waiting on payments and start getting paid automatically. Keap Pay is a payment processor built directly into your CRM — no third-party integrations, no switching between tools. You can accept credit cards, track every payment in real time, see exactly when deposits hit your bank account, and handle chargebacks without leaving the app. Because Keap Pay is embedded in your CRM, every payment is automatically linked to the right contact and order the moment it processes.
This article covers how to set up Keap Pay, how to accept payments, how to read the Payment and Deposit Dashboards, and how to handle failed payments and chargebacks. For information on how to issue a refund, see how to issue a refund in your payment settings.
Set Up Keap Pay
Setting up Keap Pay takes approximately five minutes. Your existing business information will pre-populate most fields. After submitting, your account status will show as Pending while the application is reviewed. Approval can take anywhere from a few minutes to 72 business hours.
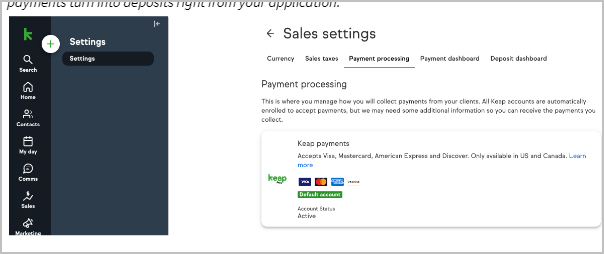
- Click Sales in the left-hand navigation, then click Settings and select Payment Processing. You can also navigate directly to the Payment Processing page in Sales Settings.
- Click Connect in the Keap Pay section. The sign-up form will open.
- Review and complete the sign-up form. Your business information on file will pre-populate the available fields. Confirm the pre-filled information is accurate and fill in any missing fields.
- Check the Terms and Conditions box and click Submit.
After submitting, your Keap Pay status will display as Pending on the Payment Processing page. You may receive an email from payments@keap.com requesting additional information to complete your activation. If additional information is requested, respond promptly to avoid delays. For more information on what additional information may be required, see the Beneficial Owner Data Requirements article.
If your status has not changed and you have not received any communication after 72 business hours, contact support for assistance.
Payment Methods Keap Pay Accepts
Once your Keap Pay account is active, you can accept payments through any of the following methods:
- Credit cards
- ACH bank transfers
- Apple Pay
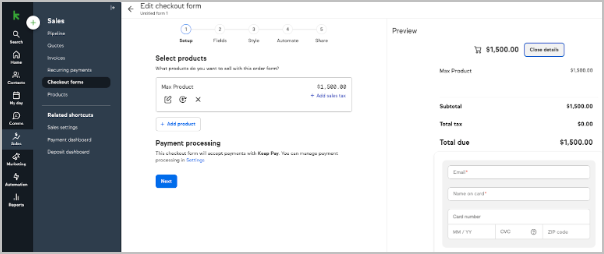
Keap Pay works with all of the following payment collection tools in your CRM: Order Forms, Shopping Cart, Invoices, and Manual Payments. Any payment collected through these tools while Keap Pay is your active processor will appear on the Payment Dashboard automatically.
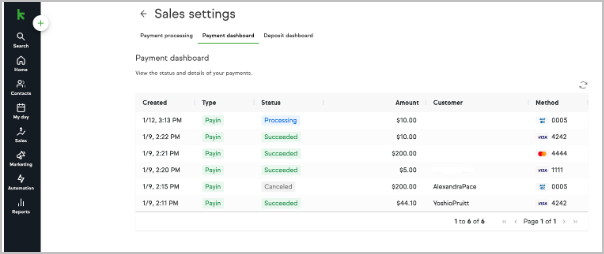
Track Payments on the Payment Dashboard
The Payment Dashboard shows the real-time status of every payment processed through Keap Pay. Use the Payment Dashboard to monitor incoming payments, look up individual transactions, manage chargebacks, and find the Payment ID you need when contacting support.
How to Access the Payment Dashboard
- Click Sales in the left-hand navigation.
- Click Payment Dashboard under the Related Shortcuts section. The Payment Dashboard is also accessible by clicking Settings, selecting E-commerce Setup, and then clicking Payment Processing.
What the Payment Dashboard Displays
Each row on the Payment Dashboard represents one transaction and displays the following information:
- Date the payment was created
- Transaction type (Payin, Refund, Adjustment, or Chargeback)
- Payment status (Processing, Succeeded, Failed, In Review, Canceled, or Presenting)
- Payment amount
- Customer name
- Payment method — credit card type with last four digits, ACH, or Apple Pay
How to Find a Specific Payment
- Click the Customer column header at the top of the Payment Dashboard and type the customer's name in the search field.
- Narrow the results by filtering on the date the payment was created or the payment amount.
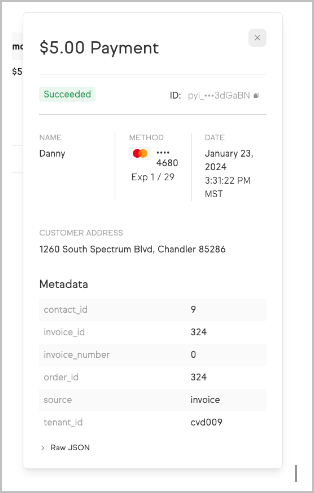
How to View Payment Details
Click any payment row on the Payment Dashboard to open the Payment Details panel. The Payment Details panel displays additional information about that transaction, including the Payment ID. When contacting support about a specific payment, provide the Payment ID from the Payment Details panel so the support team can locate the exact transaction. A Payment ID follows this format: pyi_2ajcJnr5FqywwyptamlESa4Pp2w.
How to Handle a Chargeback
When a client initiates a chargeback on a payment, the payment status on the Payment Dashboard changes to reflect the dispute. The disputed payment amount plus the chargeback fee are deducted from your account and recorded on the Deposit Dashboard. You have two options for responding to a chargeback:
- Accept the chargeback — Take no action. The chargeback will be resolved in the client's favor and no further steps are required.
- Dispute the chargeback — Click Dispute on the payment and submit your evidence, including a written explanation and any supporting screenshots or documentation.
If you win the dispute, the payment status changes to Won and the original payment amount is returned to your account. The chargeback fee is non-refundable regardless of the outcome. If you lose the dispute, the payment status changes to Lost and no additional funds are deducted.
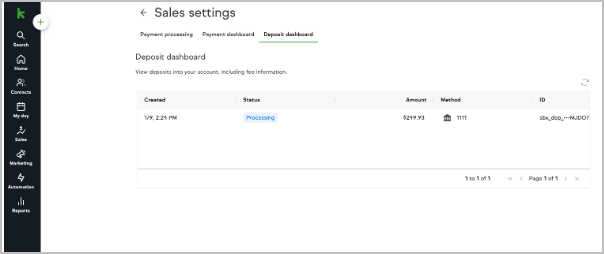
Track Deposits on the Deposit Dashboard
The Deposit Dashboard shows every deposit sent to your bank account from Keap Pay in real time. Use the Deposit Dashboard to confirm deposit amounts, see which payments made up each deposit, export deposit records to a CSV file, and find the Deposit ID when contacting support.
How to Access the Deposit Dashboard
- Click Sales in the left-hand navigation.
- Click Deposit Dashboard under the Related Shortcuts section. The Deposit Dashboard is also accessible by clicking Settings, selecting E-commerce Setup, and then clicking Payment Processing.
What the Deposit Dashboard Displays
Each row on the Deposit Dashboard represents one deposit batch and displays the following information:
- Date the deposit was created
- Deposit status
- Deposit amount
- Bank account the deposit was sent to
- Deposit ID
How to See Which Payments Made Up a Deposit
Click any deposit row on the Deposit Dashboard to open the deposit detail panel. The deposit detail panel lists every payment included in that deposit batch. For each payment in the batch, the following information is displayed:
- Date the payment was created
- Transaction type
- Payment ID
- Payment amount
- Processing fees
- Net amount after fees
Note: The total deposit amount may differ from the sum of individual payment amounts. The deposit total includes any additional fees such as deposit fees, chargeback fees, and account updater fees applied during that period.

How to Export a Deposit to CSV
Click any deposit row on the Deposit Dashboard to open the deposit detail panel. Click the CSV button in the upper right corner of the deposit detail panel to download a file containing all payments in that deposit batch, including payment dates, transaction types, payment amounts, fees, net amounts, and any additional fees applied.
How to Get Support for a Deposit Issue
When contacting support about a specific deposit, provide the Deposit ID visible on the Deposit Dashboard for that deposit entry. A Deposit ID follows this format: pyi_2ajcJnr5FqywwyptamlESa4Pp2w. Having the Deposit ID ready allows the support team to locate the exact deposit without additional back-and-forth.
Keap Pay Fees, Payment Types, and Statuses
Keap Pay Pricing
| Card Processing Fees — Applies to all credit card payments and refunds | |
| Card Transaction Volume Fee | 2.99% |
| Card Transaction Per-Item Fee | $0.30 |
| ACH Processing Fees — Applies to all ACH payments and refunds | |
| ACH Volume Rate | 1% up to $10 |
| ACH Transaction Per-Item Fee | $0.30 |
| Payout Fees | |
| Standard ACH Payout (per batch) | $0.50 |
| Additional Fees | |
| Account Updater | $0.50 |
| Card or ACH Refund | $0.30 |
| ACH Return | $15.00 |
| Chargeback (Card or ACH Dispute) | $15.00 |
Payment Types
The transaction type column on the Payment Dashboard identifies what kind of transaction each payment represents:
- Payin — A client made a payment to you.
- Refund — You initiated a partial or full refund on a payment.
- Adjustment — You adjusted the total amount owed on a transaction.
- Chargeback — A client has initiated a dispute on this payment.
Payment Statuses
The status column on the Payment Dashboard shows the current state of each transaction:
- Processing — The payment was successful and is currently processing.
- Succeeded — The payment completed processing and is available for deposit.
- Failed — The payment did not process. See the Failed Payment Refusal Codes table below for the reason and recommended action.
- In Review — The payment has been flagged for risk review. No action is required unless contacted by the payments team.
- Canceled — The payment was canceled. No funds will move.
- Presenting — The card has been presented for payment but processing has not yet begun.
Failed Payment Refusal Codes
When a payment status shows as Failed, the Payment Details panel displays a refusal code explaining why the payment did not process. Use the table below to identify the cause and the recommended next step to share with your client.
| Code | Description | Recommended Action |
| DECLINED | Declined. | Issuer decline — advise client to call their bank or try an alternative payment method. |
| DO_NOT_HONOR | Do not honor. | Issuer decline — advise client to call their bank or try an alternative payment method. |
| EXPIRED_CARD | Expired card. | Issuer decline — advise client to call their bank or try an alternative payment method. |
| FRAUDULENT_CARD | Fraudulent card. | Issuer decline — advise client to call their bank or try an alternative payment method. |
| INCORRECT_PAYMENT_INFORMATION | Incorrect payment information. | Advise client to review billing and card information. |
| INSUFFICIENT_FUNDS | Insufficient funds. | Issuer decline — advise client to call their bank or try an alternative payment method. |
| INVALID_CARD_SECURITY_CODE | Invalid card security code. | Advise client to review billing and card information. |
| INVALID_EXPIRATION_DATE | Invalid expiration date. | Advise client to review billing and card information. |
| INVALID_PIN | Invalid PIN. | Advise client to review billing and card information. |
| LOST_CARD | Lost card. | Issuer decline — advise client to call their bank or try an alternative payment method. |
| NO_CARD_NUMBER_ON_FILE_WITH_ISSUER | No card number on file with issuer. | Advise client to review billing and card information. |
| NO_SUCH_CARD_ISSUER | No such card issuer. | Advise client to review billing and card information. |
| OVER_LIMIT | Over limit. | Issuer decline — advise client to call their bank. |
| PROCESSING_ERROR | Processing error. | Retry the payment. |
| STOLEN_CARD | Stolen card. | Issuer decline — advise client to call their bank or try an alternative payment method. |
| UNEXPECTED_PAYIN_TOKEN | Unexpected payin token. | Retry the payment. |
| UNSUPPORTED_CARD_TYPE | Unsupported card type. | Advise client to try an alternative payment method. |
Keap Pay FAQs
When will my payments show up in my bank account?
Card transactions are deposited 1 business day after the transaction date. ACH transactions are deposited 4 business days after the transaction date. Both timelines are affected by bank holidays and weekends. Use the table below to find the expected deposit day for a specific transaction day.
| Card Transactions | ACH Transactions | ||
| Day of Transaction | Day of Deposit | Day of Transaction | Day of Deposit |
| Monday | Wednesday | Monday | The following Monday |
| Tuesday | Thursday | Tuesday | The following Tuesday |
| Wednesday | Friday | Wednesday | The following Wednesday |
| Thursday | Monday | Thursday | The following Thursday |
| Friday | Tuesday | Friday | The following Friday |
| Saturday | Tuesday | Saturday | The following Friday |
| Sunday | Tuesday | Sunday | The following Friday |
| Monday with bank holiday on Tuesday | Thursday | Monday with bank holiday on Tuesday | The following Tuesday |
Are there any businesses that cannot use Keap Pay?
Yes. Certain business types are not eligible for Keap Pay, and many of those same business types are also prohibited under the Acceptable Use Policy. Review the complete list of business types prohibited from using Keap Pay. If your business type appears on that list but you are currently sending email through your CRM, contact support to find out whether an exception may apply to your account.
Can I get a lower processing rate than what is listed?
A rate review is available for accounts processing more than $100,000 per month on average. To request a rate review, contact support or reach out to your Customer Success Manager.
I currently use a different payment processor. Can I try Keap Pay without fully switching?
Yes. Because your business information is already on file in your CRM, signing up for Keap Pay takes only a few minutes. Click Connect on the Keap Pay section of the Payment Processing page, complete the sign-up form, and your account will be ready to test once approved. You do not need to remove your existing processor to apply.
I submitted the sign-up form but my account is still not active and I have not heard anything.
Activation can take up to 72 business hours. If 72 business hours have passed and your status has not changed and you have not received any communication from the payments team, contact support for assistance.
I processed a payment but it is not showing on the Payment Dashboard.
The most common cause is that the payment was processed through a different payment processor, not Keap Pay. Open the order associated with the payment and confirm which processor was used. If Keap Pay was the processor and the payment is still not appearing after one hour, contact support.
How do I issue a refund?
To issue a refund for a payment processed through Keap Pay, follow the steps in the how to issue a refund in your payment settings article.
I won a chargeback but the amount returned to my account is less than I expected.
First confirm that the difference equals the chargeback fee. Chargeback fees are non-refundable even when a dispute is won. If the amount returned is still less than expected after accounting for the chargeback fee, contact support with the Payment ID for that transaction.
A payment is showing as Succeeded but it is not appearing in my Deposit Dashboard.
Credit card payments take up to 1 business day after the transaction date to appear in the Deposit Dashboard. ACH payments take up to 4 business days. If the payment has been in Succeeded status longer than those timelines and is still not showing in the Deposit Dashboard, contact support.
A deposit is showing in my Deposit Dashboard but the funds are not in my bank account.
First confirm the deposit status shows as Succeeded. If the deposit has been in Succeeded status for less than 24 business hours, allow that time for the funds to appear. If 24 business hours have passed, contact your bank to check whether there is a block on incoming transfers. If your bank confirms no block and the funds are still not showing, contact support with the Deposit ID.
How do I update my business name, address, ownership, or tax ID for Keap Pay?
Business information updates for Keap Pay — including ownership changes, business name changes, address changes, and tax ID changes — must be made by the support team. Contact support as soon as a change occurs so your account information stays accurate.
How do I update the bank account where deposits are sent?
Bank account updates for Keap Pay deposits must be made by the support team. Contact support to request the update.
Comments
0 comments