
This article covers how to create and use internal forms in Keap™, including how to build a form, add and configure fields, set up follow-up automation, publish the form, and use the form to add or update contact records. An internal form is a special web form submitted by a Keap user on behalf of a contact — for example, after speaking with a lead by phone. Submitting an internal form creates a new contact record or updates an existing one. This article does not cover public web forms. For help with public forms, see how to create a public web form in Keap.
Why Internal Forms Help You Capture Consistent Contact Data
When adding contacts manually — after a phone call, event, or in-person conversation — it is easy to miss important details or record information inconsistently across team members. An internal form in Keap standardizes the data capture process by requiring the same fields every time, reducing errors and ensuring contact records are complete and accurate from the moment they are created. Internal forms can also apply tags, add notes, and trigger follow-up automation automatically when the form is submitted.
How to Create an Internal Form in Keap
-
Select Marketing in the left-hand navigation, then select Forms.
The screenshot above shows the Keap left-hand navigation with Marketing selected and the Forms option visible. Selecting Forms opens the Forms section where existing forms are listed and new forms can be created.
-
Select Create Form.
-
Select Internal as the form type.
The screenshot above shows the Keap form type selection screen with the Internal option visible. Selecting Internal creates a form designed for internal use by Keap users rather than a public form for website visitors.
-
Select a template to use as the starting point for the form.
-
Select Start Building Your Form to open the form builder.
-
Enter a name for the form and an optional description to document the purpose of the form.
-
Customize the text for the form's submit button.
How to Add Fields to an Internal Form
Internal forms include First Name, Last Name, Email Address, and Phone Number fields by default. Additional fields can be added and default fields can be removed.
-
Select Add Fields at the bottom of the field list.
-
Select the desired field from the field selection panel. Repeat until all required fields have been added.
How to Add Additional Content to an Internal Form
Additional content fields can be added to an internal form to display text or hyperlinks between form fields. Internal forms support text and hyperlinks in additional content sections. To add a hyperlink, highlight the text, select the link button, and enter the URL. Text styling beyond basic hyperlinks is not supported in additional content sections.
The screenshot above shows the Keap internal form builder with an additional content section added. The additional content editor supports plain text and hyperlinks only.
How to Create a New Custom Field From the Form Builder
A custom field is an optional field that extends the standard contact record with business-specific data. New custom fields can be created directly from the internal form builder without navigating to a separate settings area. Select the Create New Field button in the form builder to create a custom field and continue working on the form. For more information about custom fields, see how to create and manage custom fields in Keap.
How to Delete a Field From an Internal Form
-
Select the ... button on the field to open the field overflow menu.
-
Select Delete Field.
How to Add Helper Text to a Form Field
Helper text provides guidance to the user completing the internal form about what information should be entered in a field. Helper text can be displayed as a tooltip icon next to the field or always shown beneath the field.
To add helper text as a tooltip icon:
-
Select the arrow icon to the right of the field to open the helper text input.
-
Enter the helper text in the input field.
-
The helper text displays when the cursor hovers over the information icon next to the field on the form.
To always show helper text beneath a field:
-
Select the ... button on the field to open the field overflow menu.
-
Toggle Helper Text is Always Visible to the on position.
-
The helper text will be displayed permanently beneath the field rather than only when the information icon is hovered over.
How to Add Internal Fields — Tags and Notes
Internal forms can be configured to apply tags or add notes to a contact record when the form is submitted.
-
Select Add Fields and scroll to the Internal section of the field selection panel.
The screenshot above shows the Internal section of the Keap field selection panel. Two internal field types are available — Add Tags and Add Note.
-
Select the desired internal field type:
Add Tags — Adds a tag selection field to the form. The user submitting the form can apply one or more existing tags to the contact record at the time of submission.
Add Note — Adds a text field to the form. The text entered in this field when the form is submitted is saved as a note on the contact record.
The screenshot above shows the Add Tags field on the Keap internal form. The field allows the user submitting the form to select existing tags to apply to the contact record.
The screenshot above shows the Add Note field on the Keap internal form. Text entered in this field when the form is submitted is saved as a note on the contact record.
How to Use Hidden Fields on an Internal Form
Most fields on an internal form can be set to hidden. A hidden field is not visible to the user submitting the form but still passes a value to the contact record when the form is submitted. Hidden fields are useful in the following situations:
Passing consistent data — such as an event date or company name — to every contact record created with the form, for use in segmentation later.
Preventing the user submitting the form from modifying a pre-set field value on the contact record.
For example, setting the Company field to hidden and entering Acme Corp as the value means that every contact added using this form will have their Company field automatically set to Acme Corp when the form is submitted — without the field being visible to the user.
How to Add Form Fields — Checkbox, Dropdown, and Radio
Form fields allow users to select from a list of predefined options when submitting the internal form. Three form field types are available:
-
Select Add Fields and scroll to the Form Fields section at the bottom of the field selection panel.
Select the desired form field type.
-
Enter each option for the field on a separate line. The three available form field types behave as follows:
-
Checkbox — Displays checkboxes allowing multiple selections from the list of options.
-
Select — Displays a dropdown menu allowing only one selection from the list of options.
-
Radio — Displays radio buttons allowing only one selection from the list of options.
-
How to Connect Follow-Up Automation to an Internal Form
-
After completing the form configuration, select Next.
-
Select New Automation.
The Easy Automation builder opens with the automation pre-named and the When trigger already configured for the internal form submission.
-
Select Then to configure the automation action that runs when the form is submitted.
-
After configuring the automation, select Preview to review the automation settings.
-
Select Close to return to the form builder.
How to Publish an Internal Form
The form builder saves progress automatically while working. When the form is complete, it must be published before it can be used to add or update contacts.
-
Select Save.
-
Select Save and Publish to publish the form and make it available for use.
Select Save and Exit to save the form without publishing it and return to the Forms section.
How to Add a New Contact Using an Internal Form
Internal forms can be accessed from anywhere in Keap using the New button or from the Contacts list.
From anywhere in Keap:
-
Select the New button in the top navigation.
-
Select Contact.
-
Select Add a Contact.
-
Select the internal form to use from the My Internal Forms list.
-
Complete and submit the form.
From the Contacts list:
-
Select Contacts in the left-hand navigation, then select People.
-
Select the + button at the top of the contacts list.
-
Select the desired internal form from the form selection panel.
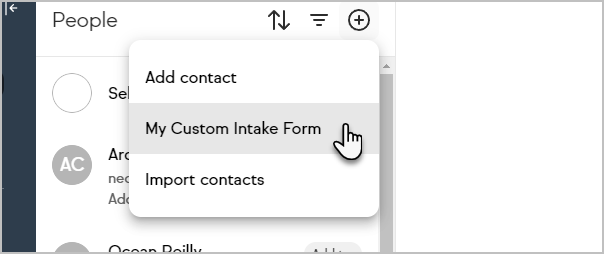
The screenshot above shows the Keap internal form selection panel accessed from the Contacts list. Select the internal form to use for adding the new contact.
-
Complete the form and select Save to create the new contact record.
How to Update an Existing Contact Using an Internal Form
Navigate to the contact record to be updated.
-
Select the More button on the contact record.
-
Select Forms.
-
Select the internal form to use.
-
Complete the form, then select Update Contact to apply the changes to the contact record.
Frequently Asked Questions
What does this article cover?
This article covers how to create and use internal forms in Keap, including how to build a form, add and configure fields, set up follow-up automation, publish the form, and use the form to add or update contact records. For help with public web forms, see how to create a public web form in Keap.
How do I add a contact using internal forms in Keap Ultimate?
In Keap Ultimate, select the + button in the navigation and select Contact. When inside the new contact record, select Add a Contact. All published internal forms will be listed under My Internal Forms.
Can I update an existing contact using internal forms in Keap Ultimate?
No. The Keap Classic contact record only supports creating a new contact using internal forms — it does not support updating an existing contact record using an internal form. Updating an existing contact using an internal form is available in the Keap Pro and Max contact record.
Comments
0 comments